Websites for Londoners you can update yourself

Resources

The Golden Rules
-
Regularly save your work. Wix, the internet, your computer, you - all are fallable.
-
Always double check your spelling and grammar.
-
Keep all your original photographs untouched and only edit copies.
-
Remember to publish your work when you've made changes.
-
Keep it real.
Logging In To Wix
-
Go to wix.com, click 'sign in' in the top right hand corner.
-
Login with your details.
-
Go to 'My Sites' and select 'Edit Site' next to the picture of your website. This will open the Wix Editor.


Editing Text
Go to the page you want by selecting it from the drop down menu at the top labelled 'Pages'. Then double click on the text that you want to edit. This will either open a text editing box or a 'List Settings' window.
If it's a text editing box, select the text you want to change and go ahead.
If a List Settings window appears you need the 'Items' tab, then select the list item you want to edit. Your text will appear and you can make changes.
There's a list of fonts available on Wix here. Click 'Save'. Click 'Publish'.
Adding Text
To add a new text box, click the 'plus' symbol on the left hand side.
Hover over 'Text' at the top, then select the format you'd like to add (normally a paragraph).
A text box will appear randomly on the page. Pick it up and drag it to where you want it to go. Double click on the text to edit it.
Click 'Save'. Click 'Publish'.


Photographs
Photos downloaded from your camera to your computer are quite large files, maybe 2-3MB each. Photos on websites need to be much smaller than that, about a 20th of the size or less (<100kb), or they take too long to load on visitors' devices. Wix has a great function that reduces the file size of your photos automatically when you upload them, but it's still wise to reduce your photo file sizes beforehand if possible. I use Photoshop Elements, but you can also do this in Apple's Photo and other popular software.
Changing A Photo
Duplicating and then changing a photo, instead of adding a new one, retains all the placement and format settings.
Select an image with the formatting you want, click the ‘duplicate’ icon in the toolbox, move the image to where you want it, and click on the 'Change Image' button which appears when the image is selected. You'll be taken to your image library where all your photos are stored. Either select a photo that's there already, or upload a new photo.
Click 'Save'. Click 'Publish'.


Remember to click on the 'Settings' gear-wheel icon for each photo and amend the settings - like what happens when people click on it, the title for Google (they call it a 'catchy description') and the 'tooltip', which is a tiny text box that appears when visitors hover over the photo (as on the right). You can write similar things for both, or leave the tooltip blank if you don’t want those tiny text boxes appearing.
Click 'Save'. Click 'Publish'.
Adding A New Photo
Click the 'Plus' icon on the left hand side, and select 'Image'. Go to "My Image Uploads' and click 'Upload Images' in the top right hand corner. Go to where your photos are stored on your computer and select the ones you want. It's a good idea to organise your Wix photos into folders so they're easy to find in the future.
Then, select the photo(s) you've just uploaded (so that a tick appears), and click 'Apply'. The photo will appear on your page. Again, always remember to amend the text settings for each photo, as above.
Click 'Save'. Click 'Publish'.


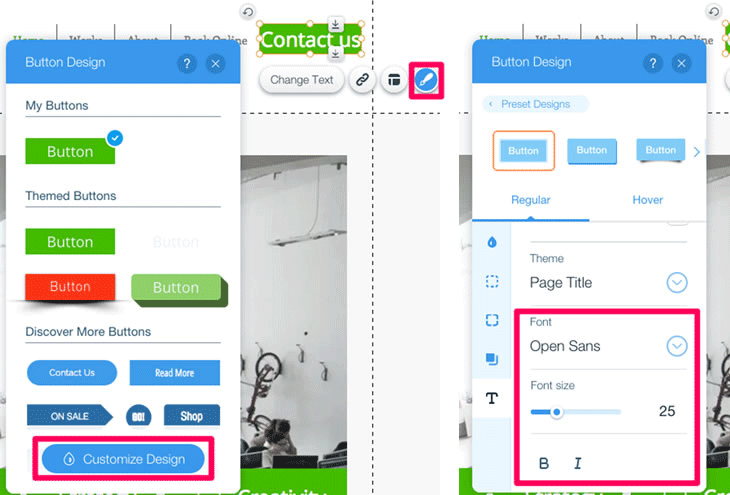
Adding A Button
A button is usually a small shape with a picture or writing in it that is a link you want to draw attention to. It can be formatted so that the colours change when you hover over it and it can be placed anywhere on your page.
To add a button go to the menu on the left hand side and click the ‘+’ sign. Select ‘Button’ and scroll through the pre-formatted options available. You can have text buttons (on one line only) or image buttons. Double click on one to place it on the page.
To edit the text on the button, select it and click on ‘Change Text’.
To change the size, select the button and drag it to the size you want.
Formatting A Button
To customise the button format, select it and click on the paintbrush icon ‘Design’ link. At the bottom of the window select ‘Customise Design’.
In the button formatting window there are some options at the top you can select from e.g. with special shadows.
In the left hand column below are the areas you can format. Take note which ‘mode’ you’re in – Regular or Hover - and make changes as you want.
Click 'Save'. Click 'Preview' or 'Publish' to see how it looks.
Wix Mobile Editor
The mobile editor in Wix is an area where you can manipulate how your site appears on a mobile phone. You cannot add anything as it’s working from the desktop original, but you can hide things, and you can move them around and change text size etc.
It’s important to ensure any changes or additions you make to your site come up tidily in the mobile view, so make sure you always check.
Click on the mobile icon – it’s located on the second menu line next to the desktop icon.
